- 참조: GoF의 디자인 패턴
- 참조(refactoring.guru): https://refactoring.guru/design-patterns/prototype
- 참조(refactoring.guru - java example): https://refactoring.guru/design-patterns/prototype/java/example
- 프로토타입(Prototype) 패턴, 원형 패턴
원형이 되는 인스턴스를 사용하여 생성할 객체의 종류를 명시하고, 이렇게 만든 견본 인스턴스를 복사하여 새로운 객체를 생성한다. 또한 코드가 클래스에 의존하지 않고, 객체를 복사할 수 있다.
시나리오: 그래픽을 편집하는 프레임워크가 있다고 해보자. 이 프레임워크를 기반으로 음표, 쉼표, 보표(악보의 5줄)를 표현하는 객체를 추가하면 음악 편집기를 만들 수 있다. 마치 그림판에서 선과 글자를 팔레트(tool palette) 에서 선택하여 흰 공간에 그리듯이, 팔레트에 음악 객체들이 있다면 선택하고 이동시켜 악보를 그리게 구성할 수 있다.
프레임워크에는 음표, 보표같은 그래픽 요소들에 대해 추상화된 Graphic 클래스가 정의되어 있다. 또 그래픽 객체의 인스턴스를 생성해서 문서에 추가하는 도구에 대한 GraphicTool 이라는 서브클래스도 정의되어 있다.
문제는 이 GraphicTool 클래스가 응용프로그램에만 국한된게 아니고 범용 프레임워크라는데에 있다. GraphicTool은 악보에 추가할 음악 클래스들의 인스턴스를 어떻게 생성해야 하는지 알 수 없다. 이렇게 되면 각 음악 객체마다 서브 클래스들을 만들어야 한다.
이 문제를 해결하기 위해서는 GraphicTool 클래스가 Graphic 서브클래스의 인스턴스(음악 객체)들을 복제하여 새로운 Graphic 인스턴스를 만들어야 하며, Graphic 서브 클래스의 인스턴스가 프로토타입이 된다.
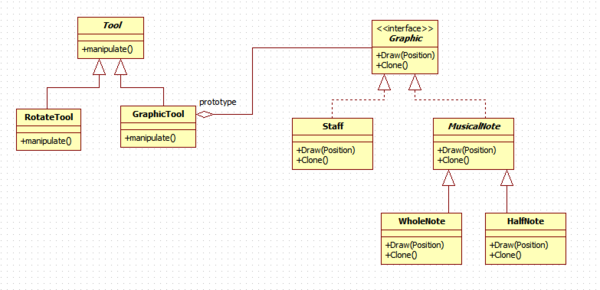
프로토타입 패턴은 3 참여자가 존재한다.
- Prototype(Graphic): 자신을 복제하는데 필요한 인터페이스를 정의
- ConcretePrototype(Staff, WholeNote, HalfNote): 복제하는 연산을 구현
- Client(GraphicTool): 프로토타입에 자기 자신의 복제를 요청하여 새로운 객체 생성
프로토타입 패턴을 사용하면 복사할 객체의 구체 클래스에 의존하지 않아도 된다. 또한 팩토리 메소드 사용시 제품을 나타내는 클래스와 쌍을 이루는 팩토리 클래스를 만들어야 하는데, 이를 피할 수 있다.
- Java 예제
자신을 복제하는 연산을 정의한 Prototype(Graphic) 과 ConcretePrototype(Staff)는 아래와 같이 작성하였다. Staff 에서 생성자 부분을 유심히 보길 바란다.
Staff(String name)은 생성하면서 곧바로 이름을 초기화한다. 또 하나의 생성자인 Staff(Staff graphic)은 clone() 연산 호출시 자기 자신을 인자로 넘겨서 복제할 수 있도록 한다. 프로토타입 패턴의 핵심이라고 할 수 있겠다.
equals()는 추후 테스트를 위해 동일성 여부 판단을 위해 eclipse에서 자동 생성을 이용하여 생성한 메소드이다.
public abstract class Graphic {

	public abstract void draw();

	public abstract Graphic clone();
}

public class Staff extends Graphic {

	private String name;

	public String getName() {
		return name;
	}

	public void setName(String name) {
		this.name = name;
	}

	public Staff(String name) {
		super();
		this.name = name;
	}

	public Staff(Staff graphic) {
		super();
		this.name = graphic.name;
	}

	@Override
	public void draw() {
		System.out.println("Draw Staff");
	}

	@Override
	public Graphic clone() {
		return new Staff(this);
	}

	@Override
	public int hashCode() {
		final int prime = 31;
		int result = 1;
		result = prime * result + ((name == null) ? 0 : name.hashCode());
		return result;
	}

	@Override
	public boolean equals(Object obj) {
		if (this == obj)
			return true;
		if (obj == null)
			return false;
		if (getClass() != obj.getClass())
			return false;
		Staff other = (Staff) obj;
		if (name == null) {
			if (other.name != null)
				return false;
		} else if (!name.equals(other.name))
			return false;
		return true;
	}
}
이번 예제에서는 또 다른 ConcretePrototype인 WholeNote와 HalfNote를 Staff처럼 단순하게 구현하였지만 다이어그램과 같이 MusicalNote를 일반화하여 구현하는것이 더 효율적이라 할 수 있다. 온음표(WholeNote)와 반음표(HalfNote)는 둘 다 음표(MusicalNote)로 치부하고, 속성을 달리하여 표현하는것이 더 효과적이다. 소스는 길지만 구조는 동일하다.
public abstract class MusicalNote extends Graphic {

	public MusicalNote() {
		super();
	}
}

public class HalfNote extends MusicalNote {

	private String name;

	public String getName() {
		return name;
	}

	public void setName(String name) {
		this.name = name;
	}

	public HalfNote(String name) {
		super();
		this.name = name;
	}

	public HalfNote(HalfNote halfNote) {
		super();
		this.name = halfNote.name;
	}

	@Override
	public void draw() {
		System.out.println("Draw HalfNote");
	}

	@Override
	public Graphic clone() {
		return new HalfNote(this);
	}

	@Override
	public int hashCode() {
		final int prime = 31;
		int result = 1;
		result = prime * result + ((name == null) ? 0 : name.hashCode());
		return result;
	}

	@Override
	public boolean equals(Object obj) {
		if (this == obj)
			return true;
		if (obj == null)
			return false;
		if (getClass() != obj.getClass())
			return false;
		HalfNote other = (HalfNote) obj;
		if (name == null) {
			if (other.name != null)
				return false;
		} else if (!name.equals(other.name))
			return false;
		return true;
	}
}

public class WholeNote extends MusicalNote {

	private String name;

	public String getName() {
		return name;
	}

	public void setName(String name) {
		this.name = name;
	}

	public WholeNote(String name) {
		super();
		this.name = name;
	}

	public WholeNote(WholeNote wholeNote) {
		super();
		this.name = wholeNote.name;
	}

	@Override
	public void draw() {
		System.out.println("Draw WholeNote");
	}

	@Override
	public Graphic clone() {
		return new WholeNote(this);
	}

	@Override
	public int hashCode() {
		final int prime = 31;
		int result = 1;
		result = prime * result + ((name == null) ? 0 : name.hashCode());
		return result;
	}

	@Override
	public boolean equals(Object obj) {
		if (this == obj)
			return true;
		if (obj == null)
			return false;
		if (getClass() != obj.getClass())
			return false;
		WholeNote other = (WholeNote) obj;
		if (name == null) {
			if (other.name != null)
				return false;
		} else if (!name.equals(other.name))
			return false;
		return true;
	}
}
이제 Prototype을 이용하는 Client(Tool, RotateTool, GraphicTool)들을 구현해보자. 이번 예제에서는 GraphicTool 을 만 이용하여 구현하기 때문에 RotateTool은 딱히 내용을 채워넣지 않았다. 사실 manipulate는 void 형을 반환하는것이 맞지만 복제된 객체의 인스턴스 주소값을 위해 Graphic을 반환하게 만든것이다. 또한 getGraphicPrototype() 함수는 동작하는데에는 필요 없지만, 프로토타입의 인스턴스 주소 확인을 위해 선언한것이다.
public abstract class Tool {

	public abstract Graphic manipulate();

	public abstract Graphic getGraphicPrototype();
}

public class RotateTool extends Tool {

	@Override
	public Graphic manipulate() {
		return null;
	}

	@Override
	public Graphic getGraphicPrototype() {
		return null;
	}
}

public class GraphicTool extends Tool {

	private Graphic graphicPrototype;

	public GraphicTool(Graphic graphicPrototype) {
		super();
		this.graphicPrototype = graphicPrototype;
	}

	@Override
	public Graphic getGraphicPrototype() {
		return graphicPrototype;
	}

	@Override
	public Graphic manipulate() {

		Graphic graphic = graphicPrototype.clone();

		graphic.draw();

		return graphic;
	}
}
확인을 위해 다른 디자인 패턴의 main() 예제들과 달리 좀 복잡하지만 천천히 알아보자. 처음에 toolPalette를 선언한다. 그리고 음표와 Staff 도구요소들을 팔레트에 추가한다.
findGraphicInPalette는 함수명에서도 알 수 있듯이 특정 Graphic 명으로 Palette에서 해당 도구를 찾는다. 해당 도구에서 getGraphicPrototype() 함수를 이용하여 프로토타입 객체를 얻는다. 그리고 manipulate()로 복제된 객체를 얻는다. 그 후 두 인스턴스가 같은지 여부와 같은 인스턴스는 아니지만 동일한지를 체크한다.
public static void main(String[] args){

	List<Tool> toolPalette = new ArrayList<>();

	Graphic halfNote = new HalfNote("halfNote");
	GraphicTool halfNoteTool = new GraphicTool(halfNote);

	Graphic wholeNote = new WholeNote("wholeNote");
	GraphicTool wholeNoteTool = new GraphicTool(wholeNote);

	Graphic staff = new Staff("staff");
	GraphicTool staffTool = new GraphicTool(staff);

	toolPalette.add(halfNoteTool);
	toolPalette.add(wholeNoteTool);
	toolPalette.add(staffTool);

	Arrays.asList(HalfNote.class, WholeNote.class, Staff.class)
		.forEach(graphicClass -> {
			System.out.println("====== graphicClass is " + graphicClass.getSimpleName() + " ======");

			Optional<Tool> matchedHalfNoteGraphicTool = findGraphicInPalette(toolPalette, graphicClass);

			matchedHalfNoteGraphicTool.ifPresent(prototypeGraphicTool -> {

				Graphic prototypeGraphic = prototypeGraphicTool.getGraphicPrototype();
				Graphic clonedGraphic = prototypeGraphicTool.manipulate();

				if(prototypeGraphic != clonedGraphic) {
					System.out.println("Not equals " + graphicClass.getSimpleName() + "instance.");
				}

				if(prototypeGraphic.equals(clonedGraphic)) {
					System.out.println("But they are identical.");
				}
			});
		});
}

public static Optional<Tool> findGraphicInPalette(
	List<Tool> toolPalette, Class<?> graphic){

	return toolPalette.stream()
		.filter(tool -> graphic.isInstance(tool.getGraphicPrototype()))
		.findFirst();
}
돌려보면 알겠지만 결과는 아래와 같다. 프로토타입 인스턴스가 복제된 인스턴스와 같은 인스턴스는 아니지만 동일한 객체라고 판단한다.
====== graphicClass is HalfNote ======
Draw HalfNote
Not equals HalfNote instance.
But they are identical.
====== graphicClass is WholeNote ======
Draw WholeNote
Not equals WholeNote instance.
But they are identical.
====== graphicClass is Staff ======
Draw Staff
Not equals Staff instance.
But they are identical.
- Prototype Registry
프로토타입 패턴 구현과 관련해서 한 가지 살펴볼게 있다. 프로토타입을 앞의 예제코드처럼 구현해놓고 써도 되지만 만약 프로토타입들이 많아지면 관리가 힘들다. 또 프로토타입 객체의 속성을 변경하거나 여러소스에서 사용시 새롭게 생성할 필요가 없으므로 원형 관리자(Prototype manager) 혹은 Registry 개념으로 제공하면 관리가 편리하다.
GraphicRegistry 클래스는 생성시에 3 가지 프로토타입을 생성하고 이를 내부 저장소 cachedRegistry 에 등록한다. 그리고 GraphicType들(Staff, HalfNote, WholeNote) 에 따라 해당 프로토타입을 반환해준다. 물론 더 똑똑한 독자라면 이 GraphicRegistry의 중복 생성도 필요가 없다는 것을 알테고, 이를 위해 싱글톤 패턴으로 구현할것이다. 물론 같은 Java 인스턴스 내에서만 효력이 있겠지만 말이다.
main() 에서는 프로토타입을 new로 직접 생성하여 GraphicTool에 추가하지 않고, GraphicRegistry를 이용하여 프로토타입 객체들을 가져온다.
public class GraphicRegistry {

	public enum GraphicType {Staff, HalfNote, WholeNote};

	private Map<GraphicType, Graphic> cachedRegistry;

	public GraphicRegistry() {
		super();

		cachedRegistry = new HashMap<>();

		Graphic staff = new Staff("staff");
		cachedRegistry.put(GraphicType.Staff, staff);

		Graphic halfNote = new HalfNote("halfNote");
		cachedRegistry.put(GraphicType.HalfNote, halfNote);

		Graphic wholeNote = new WholeNote("wholeNote");
		cachedRegistry.put(GraphicType.WholeNote, wholeNote);
	};

	public Graphic getGraphicPrototype(GraphicType graphicType) {
		return cachedRegistry.get(graphicType);
	}
}

public static void main(String[] args){

	GraphicRegistry graphicRegistry = new GraphicRegistry();

	List<Tool> toolPalette = new ArrayList<>();

	GraphicTool halfNoteTool = new GraphicTool(
			graphicRegistry.getGraphicPrototype(GraphicType.HalfNote));

	GraphicTool wholeNoteTool = new GraphicTool(
			graphicRegistry.getGraphicPrototype(GraphicType.WholeNote));

	GraphicTool staffTool = new GraphicTool(
			graphicRegistry.getGraphicPrototype(GraphicType.Staff));

	toolPalette.add(halfNoteTool);
	toolPalette.add(wholeNoteTool);
	toolPalette.add(staffTool);

......'Concepts > Design Pattern' 카테고리의 다른 글
| 구조 패턴 - 적응자(Adapter) (0) | 2021.04.23 |
|---|---|
| 객체 생성 패턴- 단일체 (0) | 2021.04.12 |
| 객체 생성 패턴- 팩토리 메소드 (0) | 2021.02.21 |
| 객체 생성 패턴 - 빌더 패턴 (0) | 2021.02.17 |
| 객체 생성 패턴- 추상 팩토리 패턴 (0) | 2021.02.15 |


댓글